使用Atlantis自动化你的Terraform Pull Request
Atlantis 是一个 Terraform Pull Request 流程自动化工具。本文将带你搭建 Atlantis 并体验其协作模式。
为什么需要它?
Terraform 已经成为了基础设施即代码(IaC)的主要工具,它让资源的配置变得非常快速且简单。在使用 Terraform 去对基础设施做变更的时候,需要通过 terraform plan 来验证变更,经过 review 过后再运行 terraform apply 来应用变更。这个过程对于个人或者微小团队间或许能够非常方便快捷,但是当在一定规模的团队需要协作的时候,管理所有变更与 PR 便会非常麻烦。
在这个过程中,你可能会面临如下的困难:
- 权限管控: Terraform 在
plan与apply阶段,不仅仅需要 state backend 的权限,还需要有 cloud provider 的部分权限(取决于变更动作,如创建、修改或删除一个 EC2),给每个人都分配这些权限显然不现实。 - PR 变更 review: 每个 PR 你可能都需要附上当前变更执行
terraform plan后的日志,已便管理员来审批并应用变更。 - 不同的 DevOps 人员可能使用了不同的 Terraform 版本(尽管你可以提前好约定工具链版本),由于版本差异,在执行变更操作的过程中可能遇到一些奇奇怪怪的问题等。
以上如果能够有一个统一的服务去管控整个 Terraform 流程,那这些问题便迎刃而解了。
而 Atlantis 就是做这个事情的。它能够在一个 Pull Request 创建的时候,自动执行 terraform plan 并将其 log 附加到 PR 中,管理员经过 review 确认变更后,通过评论来对其发送指令,Atlantis 接受到指令后,便会执行 terraform apply 来应用变更。 团队协作过程中,仅仅需要修改代码,所有 plan与 apply 操作均由 Atlantis 来完成,权限也进行了最大程度的收敛。
下图是整个流程的简要示意: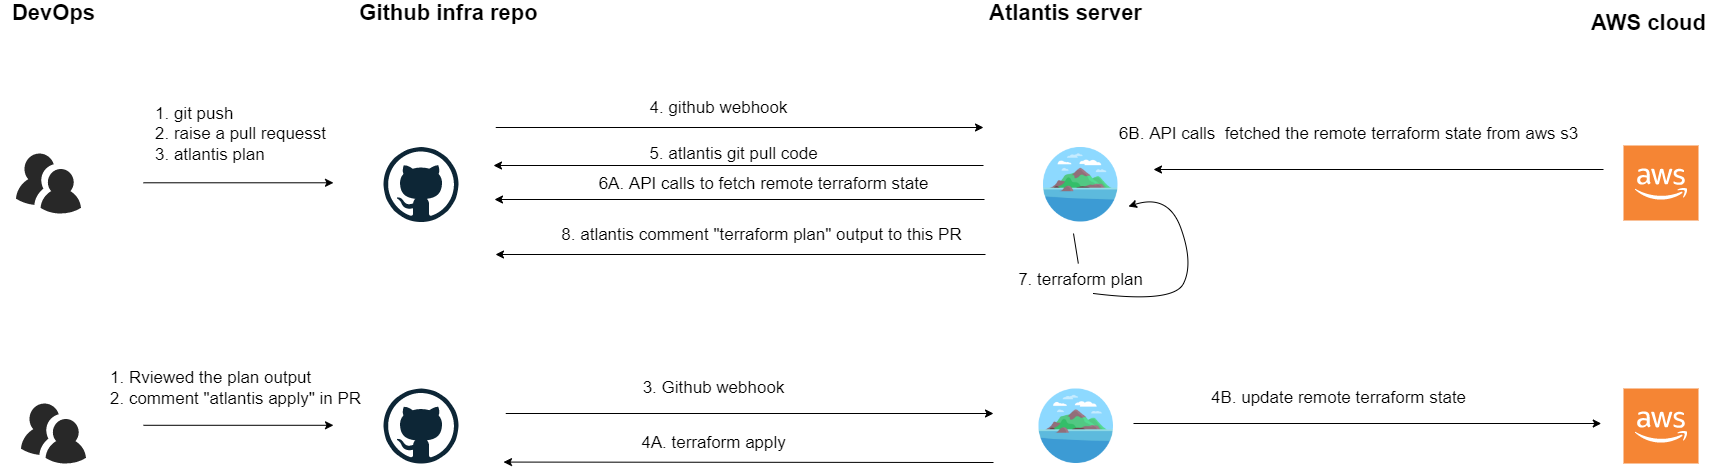
测试体验
讲了那么多,我们先来体验一下整个流程吧。 Atlantis 提供了 testdrive 的参数来让你体验整个 workflow。
首先通过官方仓库的 release 来下载 Atlantis: https://github.com/runatlantis/atlantis/releases
解压并赋予执行权限后:1
./atlantis testdrive
根据提示,输入你的 GitHub 用户名回车,会提示你创建一个名为 “atlantis” 的GitHub token(需要给予仓库权限),粘贴 token 并确认后,将会 fork 示例仓库,并通过 “ngork” 映射服务到公网以供 GitHub webhook 调用, 此时,控制台将返回一个 PR 链接,通过浏览器打开这个 PR,PR 的内容为创建了一个空资源:1
2resource "null_resource" "example" {
}
我们给这个 PR 评论一个 “atlantis plan”,Atlantis 便会在后台自动完成 terraform plan, 并将输出格式化输出到 PR 下的评论区:1
2
3
4
5
6
7
8
9
10
11
12
13
14
Terraform used the selected providers to generate the following execution
plan. Resource actions are indicated with the following symbols:
+ create

Terraform will perform the following actions:

  # null_resource.example will be created
+ resource "null_resource" "example" {
      + id = (known after apply)
    }

Plan: 1 to add, 0 to change, 0 to destroy.
我们预览无误后,再次评论 “atlantis apply”,Atlantis 便会在后台执行 “terraform apply” 并将返回格式化输出到评论区:1
2
3
4null_resource.example: Creating...
null_resource.example: Creation complete after 0s
Apply complete! Resources: 1 added, 0 changed, 0 destroyed.
之后我们便可以对这个 PR 进行 merge。
生产部署
Atlantis 支持 Kubernetes、Docker、虚拟机等多种方式部署,本文以虚拟机部署为例(其他方式部署官方文档已经非常详尽并提供了 helm 包或 kustomize 等编排文件,就不做翻译家了)。
前置环境要求
- 网络: 部署的服务器需要有公网入口供 GitHub webhook 调用。
- Terraform: 建议通过 asdf管理多版本Terraform 来安装 Terraform。
- 创建webhook密钥: 这个随意,非弱口令即可,可以通过这个在线工具生成: https://www.browserling.com/tools/random-string
- Github token: https://help.github.com/articles/creating-a-personal-access-token-for-the-command-line/#creating-a-token
配置provider凭证
非本文重点,略过, Alliot 这里是用的 AWS,则直接使用 aws cli 进行配置, 阿里云、GCP 等根据其文档配置 access key 等凭证信息即可 。1
aws configure # 根据交互提示配置即可
部署Atlantis服务
注: 本文将所有文件丢在 /home/atlantis 路径下,因此所有操作均在该路径下操作,如果需要更换其他路径,别忘了替换下文配置文件中对应的路径。
创建 Atlantis 配置文件 config.yml:1
2
3
4
5
6
7
8
9
10
11
12
13
14
15
16
17
18
19
20
21
22
23
24
25
26
27
28# Atlantis地址
atlantis-url: https://www.iots.vip:4141
# 配置启用的仓库白名单
repo-allowlist: github.com/xxx
# GitHub用户名
gh-user: alliot's blog
# GitHub token
gh-token: xxxxx
# GitHub webhook 密钥
gh-webhook-secret: xxxx
# SSL 证书
ssl-cert-file: /nginx/cert/server.crt
ssl-key-file: /nginx/cert/server.key
# web控制台鉴权
web-basic-auth: true
web-username: alliot
web-password: alliot'blog_www.iots.vip
# 端口
port: 4141
# 默认 terraform 版本
default-tf-version: 1.2.1
由于后面会用 systemd 来托管,所以采用 rsyslog 来捕捉日志: vim /etc/rsyslog.d/atlantis.conf:1
2if $programname == 'atlantis' then /home/atlantis/atlantis.log
编写 systemd 服务文件 vim /usr/lib/systemd/system/atlantis.service:1
2
3
4
5
6
7
8
9
10
11
12
13
14
15
16
17
18
19
20
21
22
23
24[Unit]
Description=atlantis server
After=network-online.target
Wants=network-online.target
[Service]
User=root
Group=root
Type=simple
Environment=""
ExecStart=/home/atlantis/atlantis server --config config.yml
WorkingDirectory=/home/atlantis
Restart=always
RestartSec=1
StartLimitInterval=0
StandardOutput=syslog
StandardError=syslog
SyslogIdentifier=atlantis
[Install]
WantedBy=multi-user.target
配置 logrotate 日志轮转: vim /etc/logrotate.d/atlantis:1
2
3
4
5
6
7
8
9
10
11
12
13
14
15
16
17
18/home/atlantis/*.log {
daily
#保留 7天
rotate 7
# 压缩
compress
#如果日志文件不存在,不报错
missingok
#用日期来做轮转之后的文件的后缀名
dateext
delaycompress
create 0640 syslog adm
}
配置完成后我们先在命令行直接运行一下,看看是否正常:1
/home/atlantis/atlantis server --config config.yml
之后重载 systemd,重启 rsyslog 服务,并启动 Atlantis:1
2
3systemctl daemon-reload
systemctl restart rsyslogd # 重启 rsyslogd 让配置生效
systemctl enable --now atlantis # 启动 Atlantis 并配置开启自启
通过浏览器能够访问前面配置的 atlantis-url,如 https://www.iots.vip,即可。
配置仓库webhook
打开需要配置 Atlantis 的仓库,Setting -> Webhooks -> Add webhook 添加 Webhook:
Payload URL: Atlantis 地址/events,如 https://www.iots.vip/events (/events很重要,不要遗漏)
Content type: application/json
Secret: 前面提到的 webhook 密钥
Which events would you like to trigger this webhook? 选择 “Let me select individual events.”
勾选: “Issue comments”, “Pull requests”, “Pull request reviews”, “Pushes” 保存即可。
之后测试提交一个 PR 即可见效果。
通过配置文件来定义 Atlantis 行为
默认情况下,Atlantis 会监控仓库内所有代码路径的变更,有时候我们并非每个路径下的都需要执行 terraform paln 或 terraform apply,这个时候我们可以通过在仓库根路径下创建 atlantis.yaml 来配置 Atlantis 行为。atlantis.yaml 示例:1
2
3
4
5
6
7
8
9version: 3
delete_source_branch_on_merge: true # merge后自动删除分支
projects:
- name: terraform-aws-sg # 项目名,这个可自定义,仅用来区分项目
dir: aws/sg # 仅 aws/sg 路径下的 terraform 会执行terraform plan
terraform_version: v1.2.1 # 指定该project的terraform版本
autoplan: # 开启自动plan
when_modified: ["*.tf", "../modules/**/*.tf"] # 监控这些后缀文件的变更来决定是否plan
更多参数配置请查看官方文档: https://www.runatlantis.io/docs/configuring-atlantis.html
结语
Atlantis 是一个看起来比较简单的工具,但它的魅力不仅如此,通过 Pre Workflow 或 Post Workflow 等钩子,能够组合其他工具链极大的提升 DevOps 效率,有机会 Alliot 后面还会继续与大家分享学习它的其他妙用。